How to prevent & remove bubbles
For ultra-clear, bubble-free epoxy coatings & castings
Bubbles interfere with the clarity of an epoxy coating or casting. Fortunately, there are several tried and true methods for both preventing bubbles from occurring while applying a coating to dealing with any bubbles that end up in the coating despite your bests efforts to prevent them. Here are some ways to prevent or remove bubbles for bubble-free coatings with epoxy.
Preventing Bubbles
Outgassing
Before coating or casting epoxy over bare wood, heat the wood and apply the epoxy while the wood is cooling. During cooling, the air in the wood contracts, drawing the epoxy in. The opposite happens if you coat wood as it’s warming (such as in the morning, in the sunlight, near a heater or anytime ambient temperatures are rising). Warmth makes the air in the wood expand, resulting in bubbles in the curing coating or casting.
Rolling and Tipping
An effective way to coat vertical surfaces with epoxy and prevent bubbles is the roll and tip method. Roll the epoxy on with a thin nap foam roller, then “tip” by dragging another section of roller or foam brush across the surface to smooth the epoxy layer.
Bubble-Free Flow Coating
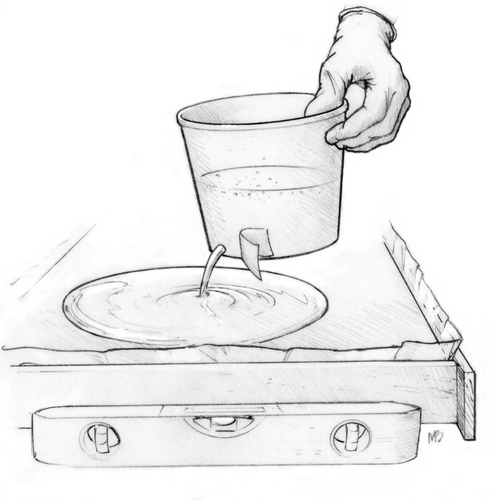
This is the best method for casting items in a clear coat of epoxy. The fewest bubbles result if epoxy is poured from the bottom of a container, through a puncture. The bubbles in the mixed epoxy will naturally rise to the top of the container while bubble-free epoxy pours from the bottom and into the casting area. Learn more about casting epoxy.
Degassing CCR for Casting
Using a vacuum degassing chamber is an effective way to remove entrapped air bubbles from Entropy CCR epoxy. Degassing is most effective when using CCR Resin and CCS Slow Hardener because of their long pot life. You should maintain a vacuum pressure of at least 25 inches of mercury (Hg) for 5- 10 minutes to remove air bubbles. The volume of epoxy used will have an effect on the epoxy’s overall exothermic heat, so time under vacuum may need to be modified for your epoxy casting. A variety of different size vacuum chambers are available online, we recommend using one with a clear lid to see the air bubbles rise to the top of the epoxy. Degassing will help remove extremely small bubbles that can be difficult to remove unless a vacuum chamber is used.
Getting Rid of Bubbles in uncured epoxy
Propane Torch
This method has been used for years by our technical advisors. Not only is it effective for removing air bubbles from the surface; it also lowers the viscosity of the surface and flattens it out a bit. Be very careful when using this technique because leaving the flame over one spot for too long could cause bubbles to appear. We don’t recommend using a propane torch over bare wood. Doing so may cause the wood to release air into the epoxy layer.
To flame treat an epoxy coating, hold a propane torch so the flame is about 2-3 inches above the epoxy and move it across the surface at a rate of 12 to 16 inches per second. Keep the torch moving and overlap the previous pass slightly. When done correctly, the surface will not discolor or burn in any way. This technique can be done after you apply the epoxy, but before it becomes tacky.
Denatured Alcohol
Spraying a fine mist of denatured alcohol over the surface will pop air bubbles as well as lower the viscosity of the surface and flatten it out. There is little risk in this method because denatured alcohol evaporates fairly quickly and does not cause air bubbles to propagate. A fine mist is essential; if the droplets of denatured alcohol are similar in size the surface will cure with small cavities on it.
Removing bubbles after epoxy cure
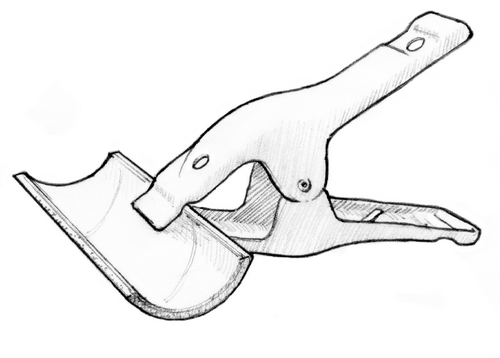
It’s not so easy to remove bubbles once the epoxy has cured, especially with casting projects. But bubbles near the surface can be sanded open once the epoxy has cured completely. (Never sand partially cured or “green” epoxy.) Remove the resulting pinholes on the surface of the epoxy by using a stiff plastic or metal spreader to apply more epoxy. Hold the spreader at a low angle to avoid scraping away epoxy. Press the spreader firmly against the surface and drag the spreader in long, overlapping strokes to “hydraulically” force the epoxy into the pinholes. Fill the pinholes in each batch area before applying the next batch of epoxy.